

Metering and Monitor Control in one box!
This time in our Dante Lab we have a Dante audio Metering and Monitor Controller, the TouchControl5 (TC5) from RTW. One small stylish desktop unit that brings a Swiss army knife into the Dante environment.
RTW is long term known for its metering equipment. Many broadcast studios in the world use their products to make sure that the audio levels that are send have correct volume and loudness. Going back to the 80s, the start of my Radio DJ carrier. I remember that most broadcast consoles that I worked on in radio studios, were equipped with PPM-meters from RTW. A sign of quality at that time.
Fast forward, today the company still provides metering equipment for studios around the world. With the launch of the TC5 they (re-)entered the monitor controller market for recording studios. Let’s see what it can do for your studio. First I give a product introduction, then we all dive into the practical test. We close with a conclusion and bug/wish list (if any).
What is the RTW TouchControl 5?
The TC5 is a Dante device with 3 main functions:
- A monitor controller with up to 32 channels,
- An audio channel metering toolkit,
- An up to 32 channel audio gain control, the “leveler”.
The TC5 wants to be the answer to the multi format monitoring demands that for instance ATMOS is pushing into the studio world. With 32 inputs and outputs with 100% flexibility the TC5 can handle almost any multi format rig. The TC5 was announced in 2022 and is commercially available since Martz 2024 (at for instance Thomann).
You insert the TC5 into a Dante audio subscription let’s say between your computer (DVS) and your Dante-to-Analog converter. The TC5 works with any other Dante device in your network, this in contrary with, (as an example), the Focusrite RedNet Dante R1monitor controller that -for now- only works with the hardware from Focusrite.
The TouchControl5 has a color touch screen (hence the name) and one big knob for volume control. The TC5 is built like a tank into a full metal housing. Configuration of the unit is done by a computer connection. Before we start testing let’s introduce each main module in more detail below.

The TouchControl5 Monitor Controller
With the Monitor controller you can control any kind of setup from mono to stereo to 9.1.4 formats and higher. There are 32 inputs and outputs to choose from and the funny thing is you design literally your own controller that fits exactly to your studio needs.
The TC5 monitor controller can be configured with maximum 4 inputs sources and 4 output speaker groups. Beside this the monitor controller is equipped with a built-in microphone for studio SPL measurements, microphone input, a headphone output and an unbalanced stereo line output. The built-in microphone can also be used as intercom mic.
The supported immersive formats are: 5.1.2, 5.1.4, 7.1.2, 7.1.4, 9.1.2, 9.1.4, 22.2. The surround formats are: LCR, LCM, 4.0, 5.0, 5.1, 6.0, 6.1, 7.0, 7.1.
Every speaker output channel has its own level, delay and equalizer setting. In this way you can tune your ATMOS rig to your needs and room. The audio level of each speaker on your listening position can be measured with the built-in noise SPL measurement tool. Sub woofers are also considered. The TC5 has its own bass management settings with cut-off frequency and sub level.
Monitor user functions beside the input and output selection are “mono”, “Dim”, “Phones”, “Reference”, “Downmix”, and “LF Boost”.
The TouchControl5 Metering Features
If you think RTW you think audio metering. They built more or less every type of audio metering in the past. The new TouchControl5 has the following metering options:
- Multiformat Peak Program Meter (PPM) and True Peak (TP) meter for metering of up to 32 channels. Digital “overs” can also be shown.
- Supports different configurations (Mono, Stereo, Surround, Immersive or Multichannel).
- Loudness meter with loudness test time control.
- Loudness Range (LRA).
- SPL meter.
- Spot Correlator for stereo signals.
- Test signal generator.
- TP Meter of up to 32 Dante channels
- Moving Coil emulation for stereo.
- Bargraph metering presentation for all formats.
Within the RTW configurator you define what type of metering is shown and in what size and form and where on the screen. Multiple metering can be shown on one screen layout.
The TouchControl5 Leveling function
The TC5 has a neat little feature that is not so common in metering and monitor control devices, an independent control of level for Dante channels. The channels can be organized as groups, where you set the level per group with a slider on the touch screen. A leveling group can consist of 1 till 32 Dante channels. In total you can define 4 leveling groups in the TC5 and these groups can be also controlled all together (relatively) by using the big rotary knob on the unit.
Dante implementation
The TouchControl5 offers a 32 channel of inputs and outputs. It has been designed around the Dante embedded platform. This means that the Dante interface is programmed directly into the RTW own firmware. This has the benefit that Dante firmware update management is included with the RTW firmware updates. No additional firmware is needed from Audinate directly.
The Device config specs:
- 16, 24, 32bit support
- Sample rate 44.1k, 48k, 88,2k, 96k
- Latency setting 1, 2, 3, 4, ,5, 10ms
The analog input and outputs
The TouchControl5 has one headphone output, an unbalanced line output and a balanced microphone input with phantom power. According to the manual all “high quality”.
There is no detailed specification found in the manual for the analog ins and outputs. Surprisingly because everything else is so well specified (even the power inserter got almost half a page). So, I cannot tell you how much power the headphone amp can deliver. What the frequency response will be on the analog speaker output or if the DA converters follow the Dante sample rate settings and clock. I assume RTW can add this in an update.
Time for testing: the TouchControl5 in use
Powering up
The TC5 costs in the EU around 3000 euros including VAT.When opening the box and knowing RTW’s reputation for HQ metering equipment, the expectations for this test are somewhat high.
The unit can be powered by POE and does not need a separate power supply. Great, one cable for data and power to a desktop unit. You do see the cable when the TC5 sits on your desk.
A press on the big knob and the unit starts powering up. Start-up takes around 72 seconds. That’s a long time before you hear audio from your speakers. I measured this by using the units own line output.
There is no standby mode in the TC5 which turns off the screen but leaves the Dante subscription running. Because of the boot time of 72 seconds, it is most likely that you leave the TC5 on 24/7, with the screen lit. The unit does generate sone heat so I suggest implementing a standby mode that could become active when there is no audio received for a definable period. This should turn off the screen automatically.
The first start-up of the new unit
After booting for the first time the screen turns on and… there is only one vertical bar graph on the screen with a slider. That’s it. I expected that RTW would show a preset for a stereo setup showing all the features, bells and whistles it can offer. But no. Garro you first have to build your own controller, metering and leveler instead of playing with your new friend. That’s difficult if you don’t know what it is capable of.
There are pre-built presets available, for sure. You can download presets from the RTW website flawlessly, once you found your way around in the editor. But there is always this first impression thing. Besides, playing around with a new machine before digging into its details is useful as wel for the learning curve.
Building my own TC5 machine
The Start
The idea behind the TC5 is that you design your own monitor controller, metering and audio leveler. I say design because you can configure almost everything including the screen layout, size of buttons, graphs etc. Time for the manual?
The introduction page on the manual says what to expect:
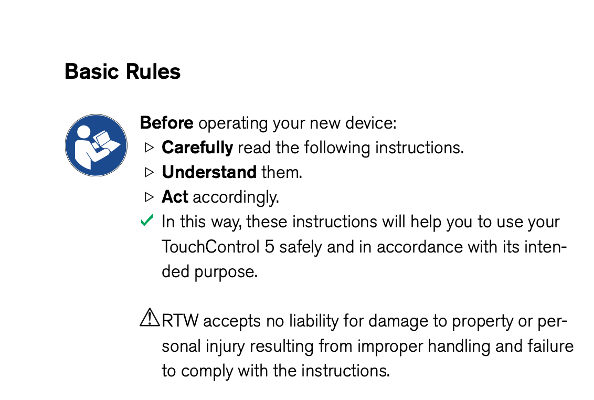
Oops! I feel at school again. Maybe I should send it back? I can’t promise to keep up with this. And what is their “intended purpose” anyway? How do I know if I “understand” them so that I can “Act” accordingly? Shit, my mind starts spinning on this.
Maybe RTW had some issues in the past with their clients and got tired of them not understanding their wonderful machines, because the clients don’t do what they are told to in the manual? Maybe. Anyways RTW decided for once and for all to put this at the start of your journey as a first handshake.
To build your own machine you log into the TC5 with your browser. The TC5 has its own development software built into it. It shows a main screen with 3 buttons naming, “system”, “presets” and “info”.
In system you find all the generic system wide settings, info is what “about” is in any other software and “presets” is the place to be for getting more action on your brand new TC5.
In 22 pages the manual will explain how to get your own dream machine. RTW called the main functions “applications” (the monitor controller, metering, leveling and talk back). Then there are “instruments”. These are functions or options within the application that can have their own settings. If you just follow the steps in the manual, you will come a long way. But schedule some hours in your agenda first.
Challenge 1: Creating my own TC5 Monitor Controller
Because the TC5 is located between your audio source and your Dante speaker outputs you must define an inputs and outputs setup in the TC5. Beside the TC5 configuration you also must assign the Dante subscriptions in Dante Controller.
To create the monitor controller application in the TC5, you start with a new preset, select the application “monitoring” and a step wizard will ask you the speaker mode for input A (mono, stereo, surround, immersive) then input B, C, D if you wish.
Input B, C and D can be either a copy of input A or a stereo input. It is not possible to define a different surround or immersive input setups for B, C, and D.
After input definition the output definition follows. You can have 4 different stereo speaker pair outputs defined in the monitor controller or one surround/immersive setup with 3 more stereo pairs. You can’t create a 5.1 surround on input/output A and an ATMOS 7.4.2 on input/output B for instance. But no worries, you can switch between presets and have it organized in that way. The TouchtControl5 supports up to 31 presets.
If you want to add a mono speaker output you must do this for output A but then output B, C and D can only be either a copy of A or stereo. I could not find another way to add a mono speaker output.
The monitor controller can also support one sub-woofer output for a stereo setup where you can define the cut-off frequency in the TC5. Two sub-woofer outputs in any of the configurations are not an option. Maybe something for a next firmware update?
Time for music?
After the output step the wizard has been done so let’s see some results and play some music! Oh dear, nothing is happening on the TC5 after selecting my new preset. The screen is black. No default GUI?
It also makes me realize that you cannot change this ‘live’ in the TC5. It is an offline workflow. So, you first make a change in the preset on your computer browser, save it and then reload the preset on the TC5 device. This becomes a time-consuming workflow and can be frustrating after a while. Maybe RTW can make a live mode in a future update?

Back to the drawing table, I guess. Select “view” in the preset editor screen opens a GUI editor. Here you see the GUI building blocks and an empty TC5 screen layout. With drag and drop the blocks can be placed and sized on the screen.
The GUI design works smoothly but is also pretty nerdy to do. It is clever made, it works stable and I’m happy with the result on my TC5 screen after a few designs.
For the first time you see the monitor controller instruments that the TC5 provides, like “mono”, “dim”, “Reference”. What I’m missing is “mid/side” and maybe 2 more reference settings. I hope RTW can fix this in a next firmware update.
Is the TC5 monitor controller part ready by now?
After defining the input and outputs and create the GUI I switched to the Dante Controller and assigned the Dante subscriptions. We are good to go, right? Nope!
The last step is setting up the routing in your preset. The routing maps the Dante inputs to the defined application inputs and vice versa for the outputs. After this step your monitor controller is ready (if all is done right and you saved the preset). Congratulations!
Incase some of your speakers need EQ, level or delay changes you can do this for every speaker output in the preset. Just open it again in the editor and select the outputs. Only as mentioned earlier the preset editing is not real-time. But RTW thought about this for the speaker EQ settings and made a copy of this function available on the TC5 screen in real-time. Select the “calibration” function on the touchscreen and you will find the EQ editor beside some other features like white noise, tone generator and.. speaker delay settings. This all now works realtime on the active preset. Great work! Don’t forget to save the preset on the TC5 this time.
What would be a great add-on, is the possibility of loading third party functions into the monitor controller like the Sonarworks “SoundID”. This would justify the investment into the TC5 even more. Maybe a future update?
Challenge 2: Adding my own Metering Device
So, the next step in our test is adding a metering device in my preset. The same configuration route applies. I must define my own Metering software application to get it going. Open the preset, press ADD and select the Metering application. The wizard will start!
First you select the input signal format (stereo, surround, immersive etc.). I choose “stereo” for this test first. Then you select the type of meter PPM or Coil. Now that goes smoothly, I tell myself.
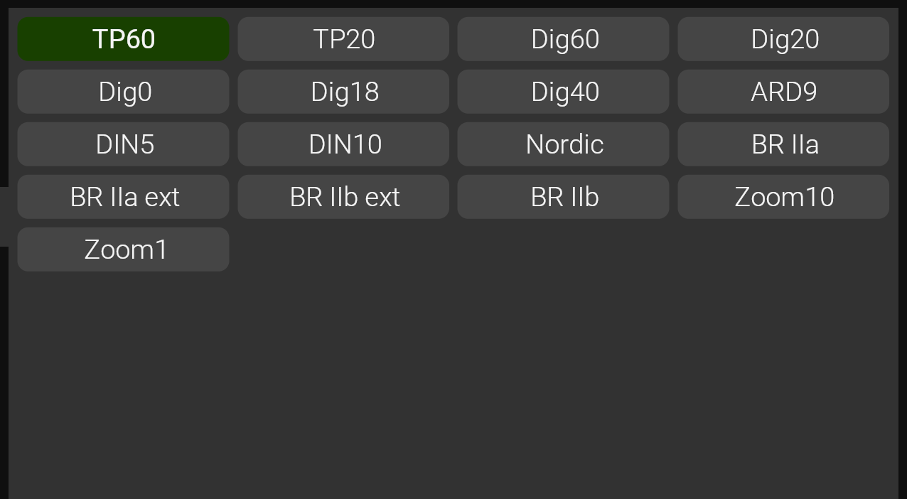
Now the wizard screen shows me 17 scale options for my requested PPM meter. From TP60 to Nordic to Zoom1. That’s a bummer what to choose? There is no internal help function nor explainer that could support me in the decision making. A bummer.
RTW, why not shown a default “most common setting”? Or a scale selection option by functional task (recording, live broadcast etc.)? Another approach could be to make a normal and expert mode in the wizard, like Trinnov does in the Nova (also a Dante monitor controller but the with room correction built in).
The last horde? Well…. Let’s go to Loudness Metering
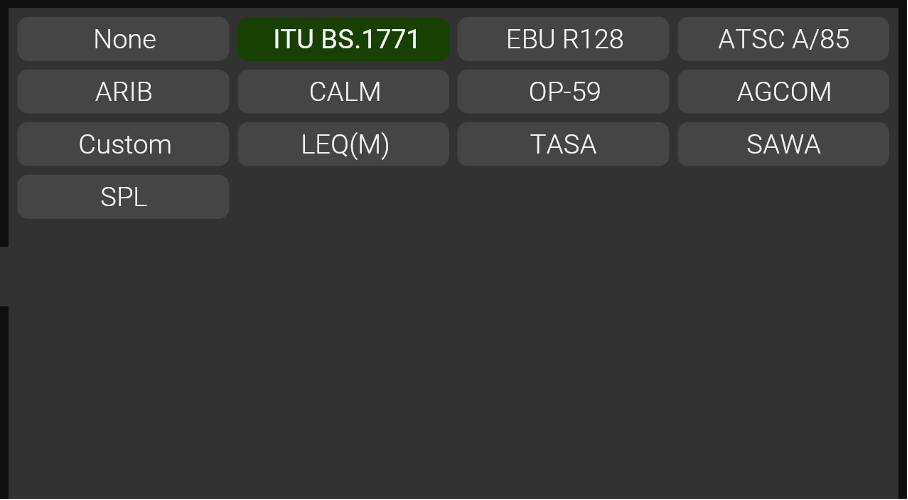
Loudness metering is most likely one of the main reasons why someone would have a metering unit like this in the studio. The TC5 is providing loudness metering for all formats. So, let’s add this in my stereo preset. Oh look! I can select between 13 different Loudness types. Amazing but again which one to choose? Funny one is named “calm”, that’s what I prefer to stay.
Streaming platforms
What I’m missing are the loudness settings for streaming platforms like Spotify, Tidal, YouTube and others. That would be a great add-on and it speaks my language. Seeing in one glance on my TC5 how the track would perform on the streaming platforms would be sick.
After guessing the loudness and scale specifications of my new metering, the next step is creating the GUI, like with the monitor controller. I learned already that without nothing will be on the screen of the TC5. The process is similar as with the Monitor controller building. So I can rely on my learning curve from the previous step.
Once your GUI has been finished don’t forget to save your work (smile). The last step is maybe not so obvious as with the monitor controller but you need to patch your newly created metering application on to the Dante network beside the already earlier patched Monitor Controller I/O.
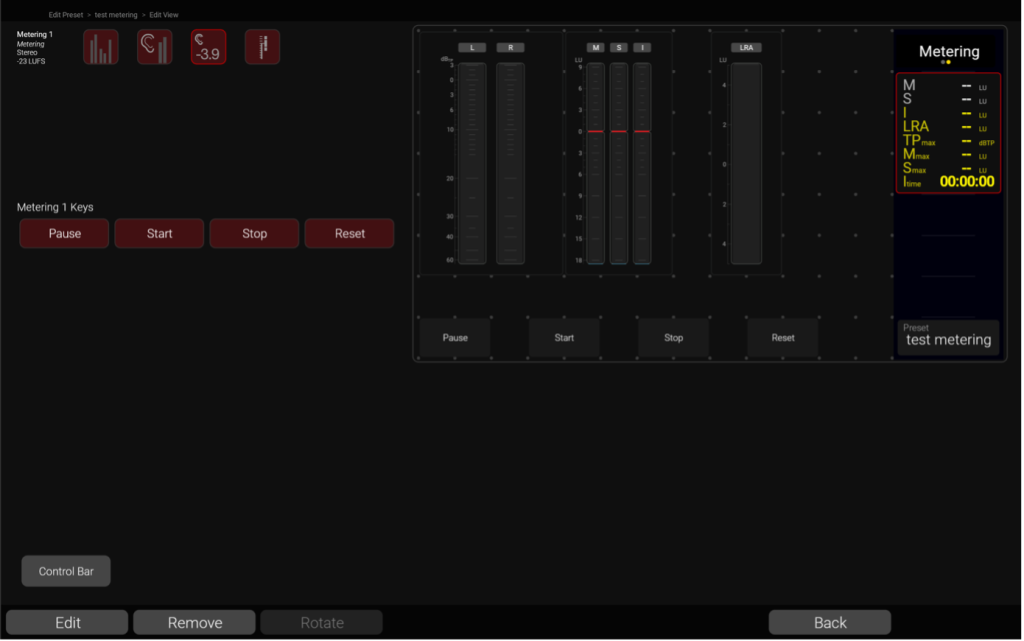
In the GUI editor you can see for the first time which metering functions are available in the TC5 and which are missing.
I mis the Vector Scope
There are no Vector Scope and/or Phase Correlation metering options available in the TC5 which I find a big miss. Both are very useful in the mixing and mastering process and should be part of such a pro-level device. What I’m also missing is a spectrum analyzer (RTA) type of screen.
What would be great is the option to mirror the TC5 screen on your computer, phone or tablet. Maybe in the browser or maybe with a little App. This would extend the usage of the TC5 in studios. I can in that case put the metering information always on a side monitor or show it in the recording studio as well. Or even on step up, a split. Define what information is on the TC5 monitor and what information is on the external screen shown. The TC5 becomes with this suggestion a metering hub in your studio.
The last(?) config step to my own TC5 machine, the leveling
To finalize my preset, I want to add a leveling page as well. All 32 channels as input and output. It is relatively simple to setup and again you do it in the PC browser. A wizard will ask you to select the “fader mode”. You can choose from mono, stereo, multichannel, surround and immersive.
Also, for the leveling a GUI must be defined and in “routing” you assign the Dante input and output channels. Job done. Doing this process for the third time starts paying off in workflow speed.
After I got my TC5 configured, I blew up the internal DSP
It is time to start using the TouchControl5 in operation, now that my preset looks ready with my monitor controller, metering and leveler built-in.
The screen looks great and is good readable on different angles. The real estate that it needs on my desk is fine and the knob feels sturdy.
The touchscreen responds well too. Clicking on speaker icons on the screen to solo them is great especially in a large immersive setup. For the first 15 minutes or so the TC5 was working as designed. I was starting to appreciate the time and effort that I had put into this device.
Then I notice small crackles when switching from monitor controller to metering screen to leveler screen. It sounded like old analog potentiometer crackles. Some analog flavor?
Soon my TC5 could no longer hold-up and went into freeze mode, signed off from the Dante network and all the fun was gone. Silence again in the studio. What happened?
I started to dig into this and noticed that the number of channels that I activated in the leveler application had a direct link to the DSP meltdown. With 4 channels I only had short crackles when changing screens. With 12 input channels active in the leveler, the DSP would meltdown within minutes.
Contact with RTW
I contacted RTW and they investigated the preset immediately. After a day RTW concluded that the preset I made was too heavy for the DSP. I should rebuild it or split it over different presets.
What is obviously missing for the user (and very relevant) is some DSP and CPU load information during the preset building phase. But also, during normal operation it is good to know if the unit is running on its limits. For now, back to the drawing table.
Let’s start with fault finding in my preset. To be honest, my stereo preset was not so fancy, so I wondered “how could it be too heavy for the DSP”?
I remembered that during my design I created for the Metering three versions and for the Leveler two different versions within the preset. At the end of the day, I used only one of each in the GUI. Assuming that the other versions would be of no harm staying there, because they are not active on the GUI nor connected. It was also not so clear in the designer who is who because all metering and leveler versions carry the same name listed on the screen. After deleting my not used parts in the preset, my problem was solved and the preset runs smooth like butter without issues for days.
Monitor controller end-to-end latency
The TouchControl5 is added into your Dante chain so it will add some end-to-end latency. Latency and monitor controllers are not best friends. Why? Well, if you play music and use your monitor speakers the latency between pressing a note and hearing the note playing is key for your timing.
The operational latency that the TC5 adds in the chain is around 3 milli-seconds. This is measured in a stereo setup, at 96kHz sample rate, 24 bits and a latency setting of 1ms in the device settings of Dante Controller. A 3ms latency is very doable and much better then the current latency of 40ms of my Trinnov Nova which will guaranty that all my played notes are off grid during recording.
Analog output and headphone amp sound quality
The TC5 has a stereo line output, a headphone output and a microphone input. As stated earlier there is no detailed specification given about the AD/DA converters. I tested the analog inputs and outputs at a Dante sample rate of 96kHz. I assume that the built-in converters will follow the Dante clocking.
Oh-no the line-output sounds bit crushed
The stereo line output is unbalanced on a 3.5mm mini jack. I would have preferred a balanced output on normal TRS jacks. But this is now the least of my concern. The real issue lays in the sound that comes out of the line output. It sounds like if there is a bit crusher effect added. There is obviously something wrong with the line output. I don’t know if this fault is related to my unit only. But in this way I can not test the line-out.
The headphone Amp
The headphone amp has a software control for volume and amplification. In the settings you can crack up the maximum output signal from a default 0dB to +20dB.
Tested with my HEDDphone the 0dB output is too low for the headphone. If you put it on +20dB some distortion /coloring is noticeable. I think +12dB is around the best the headphone amp can handle.
Sound quality wise I want to mention that this is always a personal opinion, not a fact. Every ear is different. For this test I referenced the TC5 headphone amp against the Dante Focusrite AM2 stereo monitor controller. I used two types of headphones. The high-end HEDDphone (version 1) and the midrange AudioTechnica ATH M50x. A headphone that I use for podcasting, recording and my DJ/radio work.
The TC5 can drive both headphones very well with the 12dB setting in the software. I noticed on both headphones a difference in the width and depth spreading of the stereo signal when switching between the Focusrite and the RTW. The Focusrite does this better. The sound color is also different. The TC5 sounds darker, like a bump on the low-Mids. My conclusion is that the headphone amp on the TC5 is fine for checking audio but not good enough for being your main headphone amp when mixing and mastering.
The good thing is that you don’t need to use the headphone output on the TC5. In the software you can forward the headphone output functionality to any Dante output and then use a headphone amp of your choice.
The microphone input and talkback
The TouchControl5 has one microphone input on XLR. There is phantom power available by a software switch. The target use of this input is for talkback or as a measurement microphone. It is not aiming at recording, but it would be theoretically possible, since the signal can be routed to a Dante recording output. There is also a microphone built into the unit that can be used for the same functions. Why not singing into your monitor controller?
The internal microphone offers a 12 dB amplification. For the external microphone input (XLR) there is a separate menu item for amplification. This supports an amplification of maximum 60dB. The setting is part of the general setting tab. This leads to some confusion when defining the Talkback application where only the internal microphone is shown. Maybe an idea adding this XLR setting (also) in the talkback application?
By the way, when using the built-in microphone for talkback the signal is loud and clear. No need for an external microphone at all for the Talkback function.
Conclusion after some days of usage
For multi-channel speaker formats this is a great monitor controller with unseen configuration possibilities. The learning curve might be steep but once you got the hang of it you can archive the Monitor Controller and Metering that you wished for. With its 32 inputs and outputs it should be ready for any studio change you might run into in the future. It will work with any Dante converters and benefits from the routing options that Dante provides.
For stereo usage the metering options were limited (I missed the phase correlation and vector metering) and on the monitor controller part listening to the mid/side signal is a basic demand.
The screen visibility is good under different angles and the volume knop feels sturdy and nice. The TC5 looks good on your desk and the size is just right.
The TouchControl5 is not just a bed of roses. The non-working line output, a power-up time of 72 seconds and the already mentioned steep learning curve at the start are some things to be considered as well.
The current implementation of the software makes my insecure if the metering settings chosen by me in the preset definition are correctly chosen. I must be sure that the settings are correct set for what is used in the recording industry.
I added 19 wishes/suggestions for future firmware updates. Lets hope that RTW sees the potential in the suggestion to change the TC5 into a metering hub by creating a live view of the TC5 screen metering information on your computer or tablet.

Bugs, Faults and Irregularities (if any)
Below the list of notes I made during testing.
- The analog inputs and outputs are not specified in the manual.
- There is no screen switch-off mode.
- Power on takes 72 seconds.
- The analog line output sounds bit-crushed and is not functioning properly.
- Instruments from the metering/leveler applications, that are not assigned to the GIU within a preset built, still use CPU/DSP power under the hood. This can cause DSP overload.
- The user can overload the DSP/CPU without knowing this. Some kind of indicator during the preset design and TC5 live operation is needed.
- You can’t see in the browser if the connection with the TC5 is lost. Can your edit work get lost in this state?
- The moving coil meters did not move much on the screen (could be a setting but hey how should I know what to choose).
- An explanation in the manual of the colors (blue, green, yellow) shown on the LRA meter would be highly appreciated.
- Make sure that the user selects the correct scale, loudness type and moving coil settings for the job it is intended to do (recording, broadcasting etc.).
- Help/hints information in the browser during preset building is missing.
Wishes and suggestions (if any)
When you test new hardware or software there are always ideas for improvements or extensions. Here is my list.
- It would be nice having the option to activate a preset into the TC5 from the web browser, to speed up the design process.
- Perform changes of the settings in real-time. Currently you can only change settings offline and reload the preset. Except for the EQ settings but this is not mentioned in the designer as a hint.
- There is no standby mode available where for instance the screen is shut down and the unit goes into a low energy state, but the Dante connections are maintained. This to speed-up the booting time of 72 second. When it receives an audio signal the standby mode should be ended automatically.
- Add a button in the leveling screen for using the volume slider with the big knob instead of only the touch screen.
- Add a mid/side monitoring function.
- Add two more reference settings.
- Add a phase correlation metering for stereo.
- Add a vector scope for stereo.
- Add a spectrum analyzer (RTA) per channel.
- Add help/info function for selecting PPM scale and loudness standard.
- Add streaming platform loudness demands (Spotify, Tidal, Apple music etc.) in the loudness rules.
- Add auto naming increment for the Metering and Leveling application.
- Mirror the running TC5 screen on your computer, phone or tablet. Maybe in the browser or maybe with a little App.
- Create an amazing stereo default preset as default shown at first start-up.
- Introduce a normal and expert mode in the TC5 designer, selectable on every screen.
- Introduce a default suggestion for scale and loudness based on the type of usage.
- Add the XLR input amp setting (also) in the talkback application settings.
- Support of two subwoofer outputs in all configurations.Support of room correction profiles like Sonarworks SoundID on the speaker outputs.
Response from RTW
I asked RTW for a respond on the findings in this article. RTW was willing to share their point of view and insides to future development. Below their answer taken 1-to-1 from the Email I received from the product manager.
Default Preset: We agree on your comment, and we will include a new and much better default preset with an upcoming firmware.
Multiple subs: Indeed, it’s on our list.
Presets Live Mode: Yes, we are aware of this and plan to introduce it later.
Mid/Side: Yep. Admittedly, we’ve had a lot of focus on immersive speaker setups, but of course, proper stereo tools should be available. There are lots of them already, and mid/side is on our list.
Integration with SoundID and other calibration tools: Nice idea, we’ll definitely consider this one.
Built-in help texts: We have this with our TouchMonitor series and plan for an even better implementation for TouchControl 5.
Loudness Scales: CALM refers to the US loudness regulations. CALM = Commercial Advertisement Loudness Mitigation Act. Agree that we could do better at explaining this on the GUI.
Screen Mirroring: On longer terms, it’s our goal is to make something like that.
DSP load indicator: Indeed that would be nice, and is coming with a future update.
“Bitcrusher” output: We haven’t reproduced that one and will investigate the unit once we get the chance to do so. There’s a chance you got a very early HW-version, we’ll definitely have a check on that!
About DanteSupport.com
DanteSupport.com is an independent platform for Dante equipment and networks. We perform tests and reviews of equipment in our own Dante lab and share the results on our platform. We have a vision for Dante in the recording and pro-studio environment as well as in the music instrument segment. By experimenting and testing we want to find out what AoIP can do for the recording and music production industry.
Become a member and leave a comment at our Facebook Group All4Dante
Click here: All4Dante


